原理图
Schematics
Schematics are files containing block and entity information of a certain area a player scanned with the Scan Tool in-game. You can use the scan tool and scan ANY building or structure you like in singleplayer or multiplayer and then have your {% worker_link builder %} build it for you (provided that you give them all the materials needed, of course).
Scanning a New Structure
Once you have a structure or area you want to scan to have your Builder build, you need to determine the exact area that needs to be scanned.
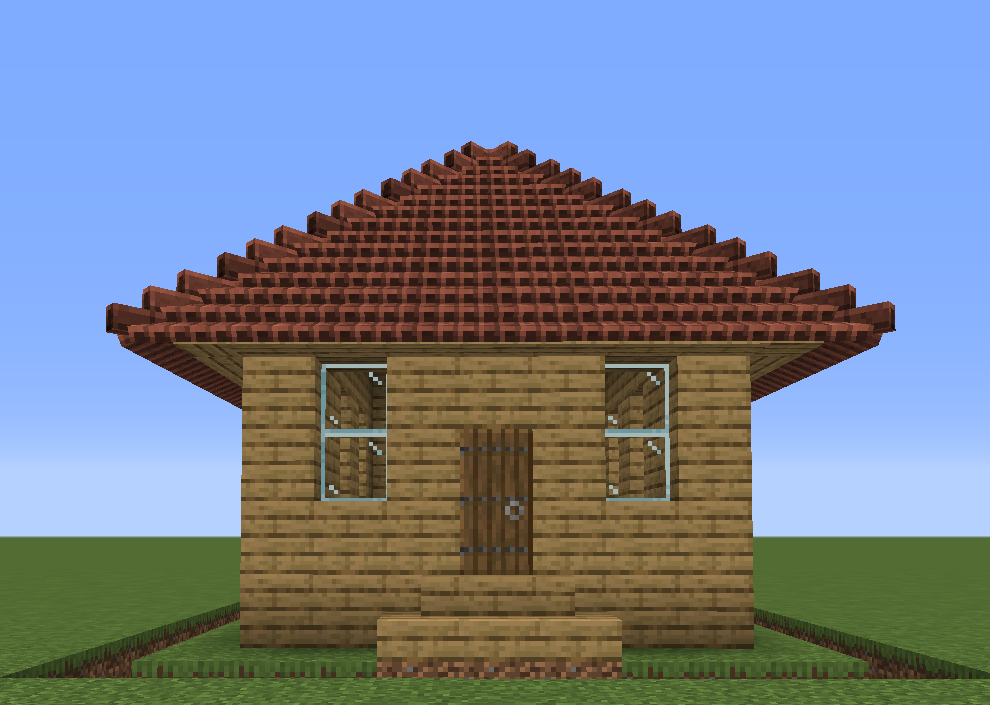
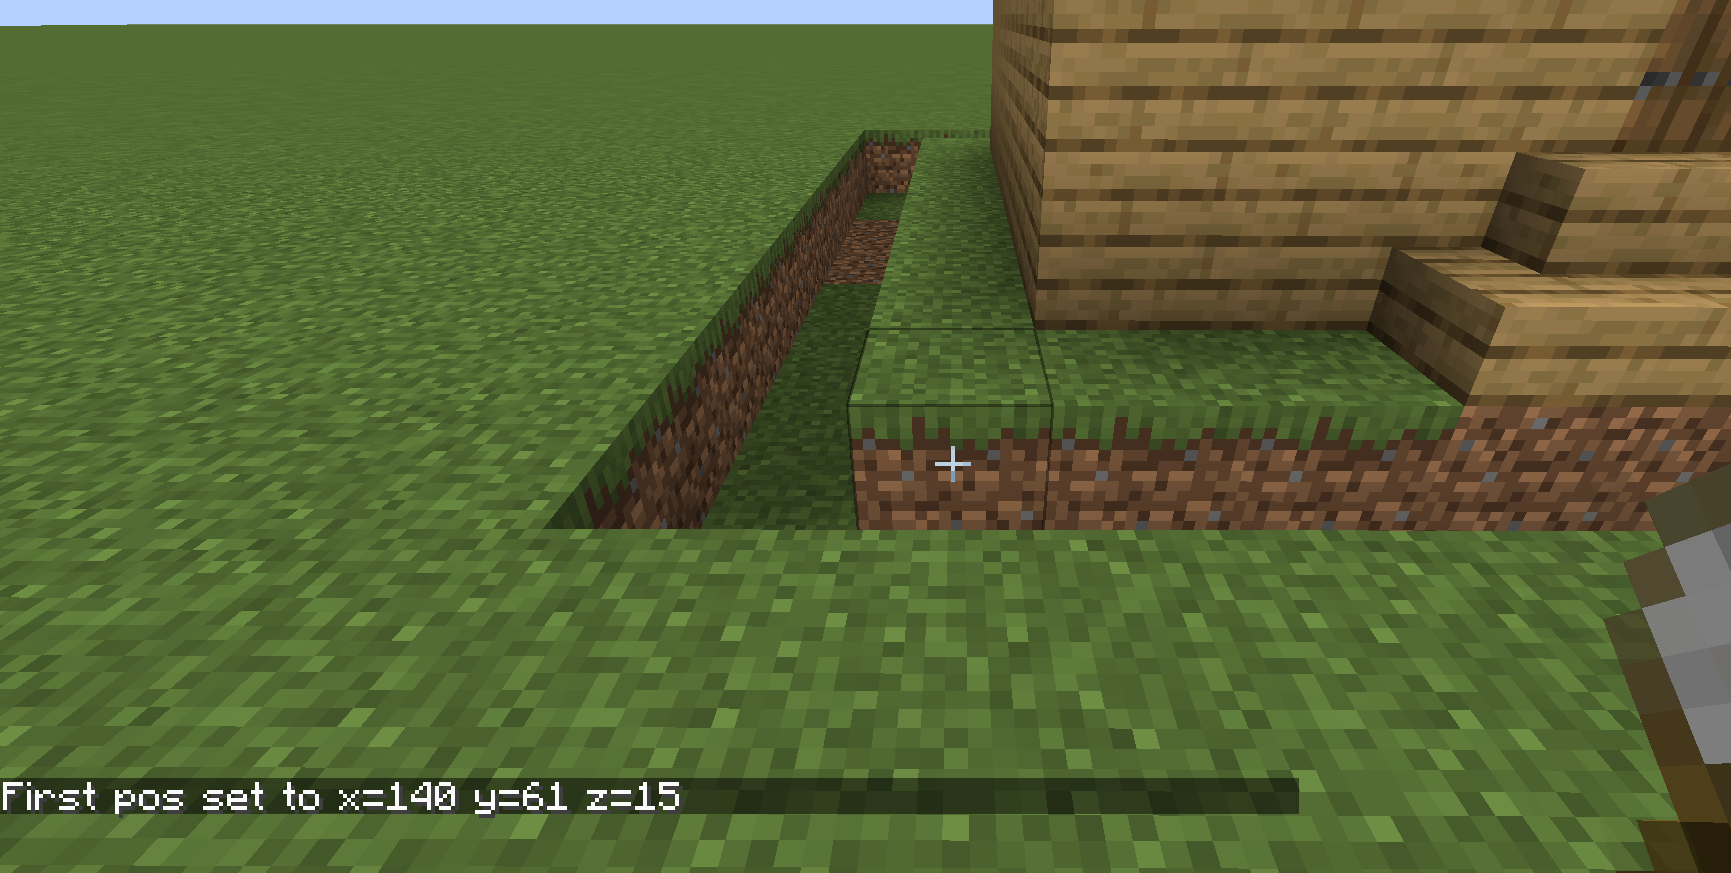
Take your Scan Tool and left-click the lowest left block of the area and then place a block (it can be a placeholder block in the top right corner and right-click on it.
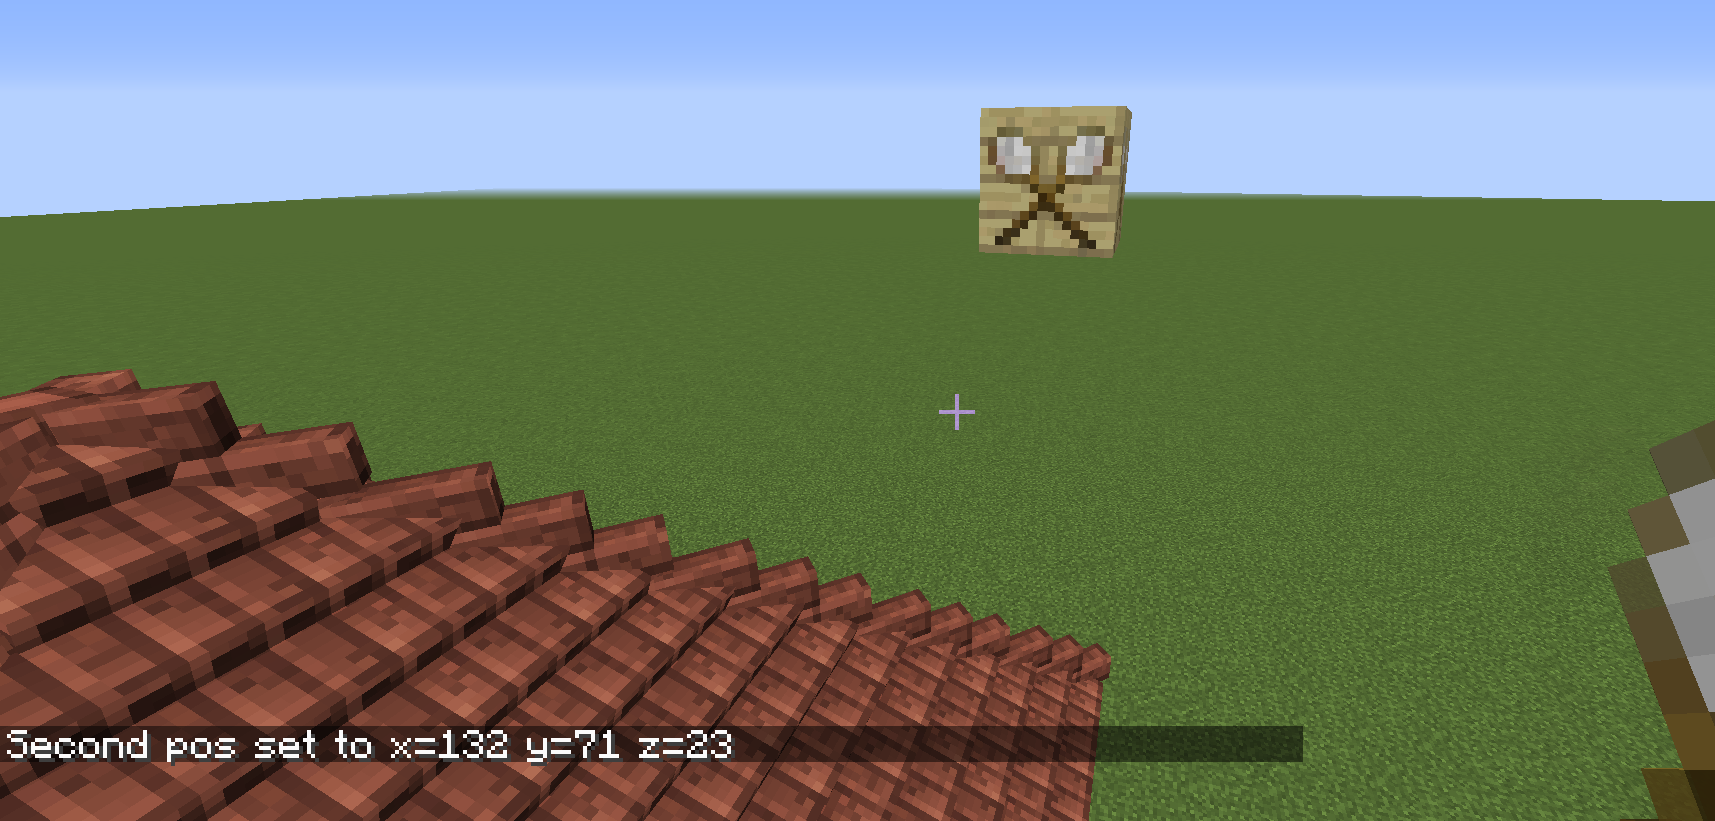
Then click in the air to see the entire structure.
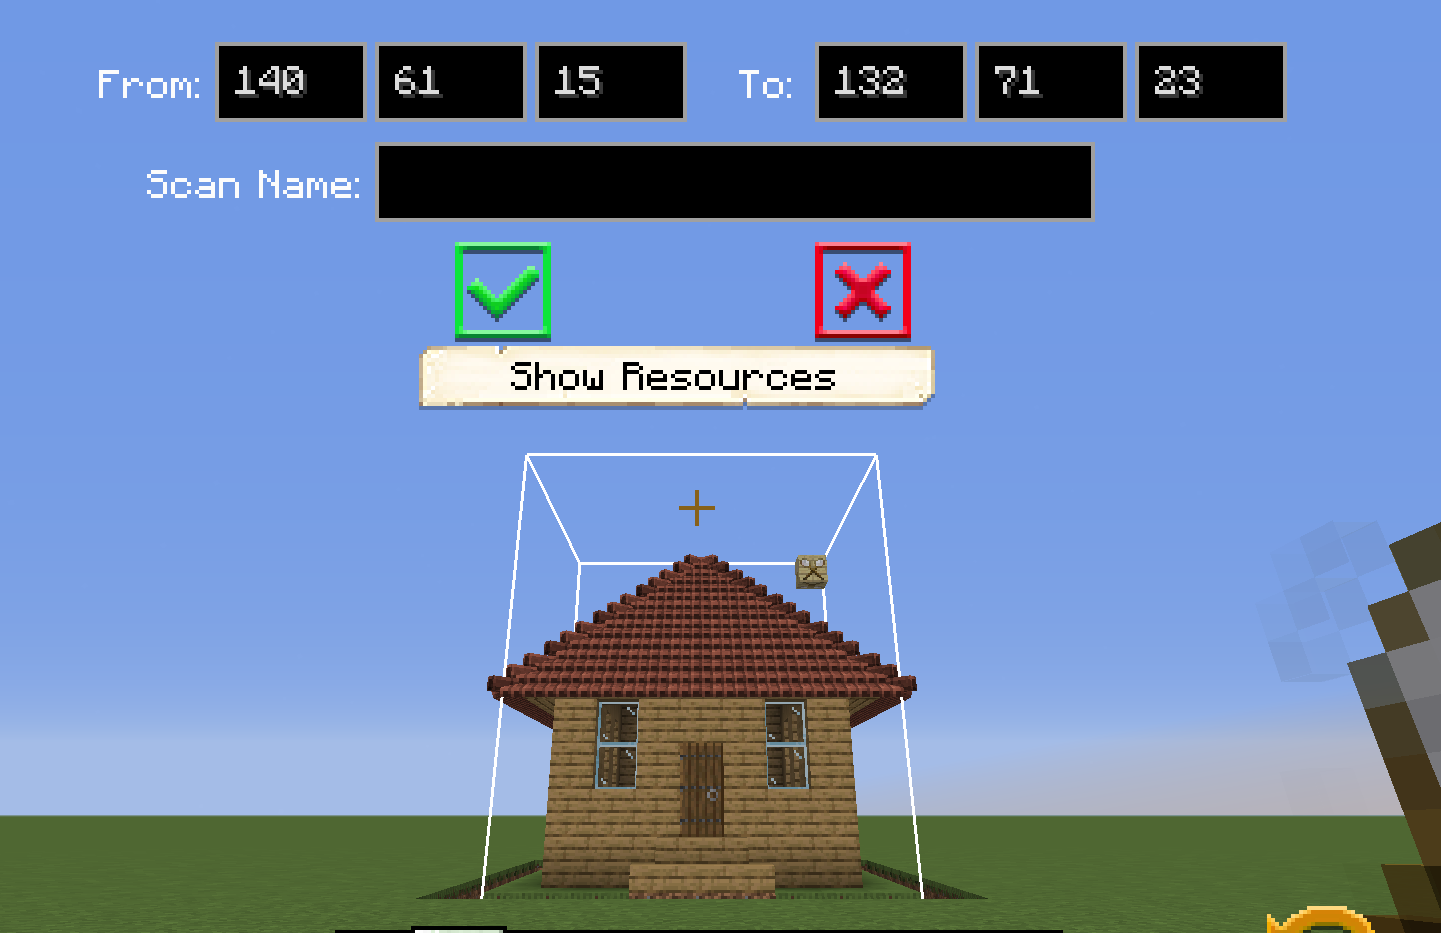
Once you have the full area set, you can press Escape and the white outline of the scan area will stay in place. Go around it to double-check that everything you want is in the scan area. If the area contains multiple eligible anchor blocks (hut blocks, tag anchors or decoration controllers), you need to shift+left click the correct anchor block (e.g. the barracks hut block in a barracks schematic). When you are ready, you can right-click in the air again to get the GUI to display where you can enter your scan name. Then press the green checkmark to save the scan.
SPECIAL NOTE: Do not rename the file after scanning. It MUST be scanned with the correct name.
{% version "1.18.2" before=true %}
Scans are saved in ../minecolonies/scan/new/....
Once the scans are saved, they need to be moved to the ../structurize/schematics/(folder)/file if they are a custom hut.
{% endversion %}
{% version "1.19" after=true %}
Scans are saved in */blueprints/<yourplayername>/scans.
Once the scans are saved, they need to be placed in a style pack, preferably in the correct folder. See the style packs chapter for more details.
{% endversion %}
Placing a Schematic.
{% version "1.18.2" before=true %}
Once you have scanned a structure, you can use the build tool to have your {% worker_link farmer %} build it for you. Once you right-click with the build tool, you will have to select "My Schematics" (in the left dropdown menu) and on the right dropdown menu you will see the scans that you have made. There is also a Rename button where you can change the name of the scan. You can also delete any of your saved scans.
{% endversion %}

{% version "1.19" after=true %}
The scanned structure can be found in the build tool under the style pack with your own name. Click "Switch Pack" -> "<yourplayername>" (icon looks like the scan tool) -> "scans".
{% endversion %}
{% version "1.19" after=true %}
Style packs
Styles are now structured in so-called style packs. This is similar to a resource pack or data pack, in that it has a file with some metadata about the style (the name, a description, optionally a link to an image, etc.), and a folder structure with the actual files.
Stylepacks live in the blueprints folder, within your Minecraft folder. This folder already contains one style pack: One with your player's name. This style pack will contain your scanned files, and can be used to test schematics. In order to make a new style, you need to make a new schematic pack.
The pack.json
This json file contains metadata describing the style:
| Key Name | Type | Description |
|---|---|---|
"version" | number | Pack version, start at 1, increase it whenever you make a new version of the pack |
"pack-format" | number | Descriptor for the pack format, needs to be 1 at the moment |
"desc" | string | Description of the style. This will be visible in the build tool to explain what your style is about |
"authors" | array of strings | Names of the authors, in order to credit them. This is visible in the build tool |
"mods" | array of strings | Names of used mods (ids). The style is not visible if one of those mods is not installed, to prevent broken schematics |
"name" | string | The name of the style pack |
"icon" | string | The name of the file with an icon which is showed in the style packs selection screen |
You have to increase the version number whenever you release your pack for others to use, or whenever you install a new version onto a server. You don't need to increase it when testing changes purely in single-player.
The folder structure
There are several folders, separating the buildings and decorations in categories.
Each of the folders at the highest level can have a couple of icons, named icon.png and icon_disabled.png. Those are shown in the button bar right above the hot bar.
You can download a template folder structure from github (template.zip), which contains the icons used for the official styles already.
That github page also contains examples how different styles are structured.
An overview with which buildings go into which folders can also be found here.
With a few specific exceptions, you don't have to strictly follow the standard folder structure -- but it's recommended to stick to it when possible to make it easier for others to find specific buildings and decorations. But you're free to make extra folders to help group separate but related sets together, especially if you don't want them to appear directly as alternate buildings. E.g. if you have two styles of roads, one for early game and one for later game, you could put them in infrastructure/roads/simple/ and infrastructure/roads/nice/.
Note: It's strongly recommended to have each folder only contain files or subfolders, but not both. While it is possible to mix them, the build tool doesn't display it as nicely.
{% endversion %}
FAQ
This is a FAQ section to answer common questions regarding schematics in MineColonies.
How do I install custom schematics I just downloaded?
{% version "1.18.2" before=true %}
Those custom schematics go in */structurize/schematics. Unzip the zip you downloaded, and put all subfolders in the schematics folder. That folder should contain folders like <stylename>, decorations, walls, supplycamps etc. (depending on which style you installed)
{% endversion %}
{% version "1.19" after=true %}
The style pack goes in the "blueprints" folder. Unzip the zip, and find the folder containing the pack.json (either the unzipped folder, or a folder directly in it, depending on how the zip was made). This folder needs to be placed in */blueprints directly, not any subfolder thereof.
{% endversion %}
What and where is the scans folder?
The scans folder is where the schematics are saved after performing a scan using the scan tool in MineColonies.
{% version "1.18.2" before=true %}
This is a client-side-only directory which is located in Minecraft's folder under: */structurize/scans/. Freshly scanned schematics can be found in */structurize/scans/new/ unless they have been renamed in-game. (If they aren't there, look in */minecolonies/scans/new.) This directory is shared between all your singleplayer games and multiplayer games.
{% endversion %}
{% version "1.19" after=true %}
This is located in your own style pack in Minecraft's folder under: */blueprints/<yourplayername>/scans/. This folder is shared between all your singleylayer and multiplayer games.
{% endversion %}
Where is the schematic folder?
{% version "1.18.2" before=true %}
Custom schematics need to be copied inside the schematic folder. For both singleplayer and multiplayer games, the folder is under */structurize/schematics/.
{% endversion %}
{% version "1.19" after=true %}
Custom schematics need to be placed in a (custom) style pack. For more information about that, look there.
{% endversion %}
I have a "*/minecolonies/01e6a291-8a01-4763-bcae-f3a8797b1d52/cache/" folder, what is that for?
{% version "1.18.2" before=true %}
When playing on a server, the server needs to send the schematics to the players so that the build tool's preview works. Those schematics are saved in Minecraft's directory under */structurize/{ServerUUID}/cache/, where ServerUUID is the unique identifier of the server. Those directories can be safely removed as they are automatically created by the server when needed.
{% endversion %}
{% version "1.19.2" after=true %}
This was previously used to save schematics from a server and was automatically created as needed. However, this is no longer needed in 1.19.2 and later, so this folder can be removed safely.
{% endversion %}
{% version "1.19.2" after=true %}
I have a "/blueprints/clients/" folder, what is that for?
On a server, this folder holds a cached copy of the decorations and shapes used by your players -- possibly even including entire style packs that they've installed themselves (though note that for game balance purposes they won't be able to make functional buildings this way; these must be installed "properly" on the server to be usable).
You can delete these folders at any time (though preferably when the player is not logged in); they will be re-created as needed.
{% endversion %}
Can I just build my own buildings and then get the colonists to "move in"?
No. Functional buildings must be constructed by the Builder. You have to either use one of the prefabs provided by existing style packs (either included in the mod or via various addons installed separately), or design your own custom huts as an explicitly separate step (typically in a special creative designing world), before getting the builder to place them in your real colony. MineColonies is more like an RTS than it is like classic Minecraft building.
How to create custom huts?
To create new schematics, there are some guidelines that you must follow: the scans MUST have the same footprint for each level of the hut; the scans must contain the hut's block, for example the Builder's Hut block for the {% building_link builder %}; the hut block need to be exactly at the same place and have the same rotation for each level.
Ensure you are building your custom hut outside of any colony borders. When placing the hut block inside the custom hut, shift+right click to place it without activating it. Then you can scan and save the schematic.
{% version "1.18.2" before=true %}
The scans' filenames need to follow the naming convention: {StyleName}/{HutName}{HutLevel}.blueprint. For example, for the Builder's Huts with the MyOwn style, we would have:
myown/builder1.blueprint
myown/builder2.blueprint
myown/builder3.blueprint
myown/builder4.blueprint
myown/builder5.blueprint
- Note: In the build tool, the extension is hidden. HutName can be any of the listed huts below. The maximum level is 5 (except for the Tavern; its max level is 3).
Alternative designs can be placed under a style name like "myownalternative", or a subfolder like myown/alt/*.
{% endversion %}
Once ready, move the myown folder into the blueprints folder and start your game. You should be able to see it with the the build tool.
Note: Remember that you need the appropriate hut in your inventory to be able to see the schematics in the build tool.
{% version "1.19" after=true %}
The naming for the buildings is not strict anymore. The only things that are important are that they are named consistently, that their names end with the hut level, and that you only use lowercase letters in the hut names (avoid capitals, spaces, or other punctuation).
Alternate designs can just have a different name than the primary one. E.g. if you named the level 1 builder's hut "builder1", an alternative version could be called "altbuilder1" or "builderalt1" or even something completely different ("constructionworker1").
Don't use numbers anywhere in the name except right at the end for the level. E.g. "alt1builder1" won't work as expected.
Once ready, you need to make a style pack out of them.
The schematics are visible in the build tool without the hut block, but you can't view them in survival mode (their button is greyed out, with an error message that you need to have the hut block).
{% endversion %}
[1.18] Custom Hut Filenames
Here is a full list, up-to-date as of 14 October 2022, of the building names. Please note do not use capital letters in hut names.
| Level 1 | Level 2 | Level 3 | Level 4 | Level 5 |
|---|---|---|---|---|
| archery1 | archery2 | archery3 | archery4 | archery5 |
| alchemist1 | alchemist2 | alchemist3 | alchemist4 | alchemist5 |
| baker1 | baker2 | baker3 | baker4 | baker5 |
| barracks1 | barracks2 | barracks3 | barracks4 | barracks5 |
| barrackstower1 | barrackstower2 | barrackstower3 | barrackstower4 | barrackstower5 |
| beekeeper1 | beekeeper2 | beekeeper3 | beekeeper4 | beekeeper5 |
| blacksmith1 | blacksmith2 | blacksmith3 | blacksmith4 | blacksmith5 |
| builder1 | builder2 | builder3 | builder4 | builder5 |
| chickenherder1 | chickenherder2 | chickenherder3 | chickenherder4 | chickenherder5 |
| citizen1 | citizen2 | citizen3 | citizen4 | citizen5 |
| combatacademy1 | combatacademy2 | combatacademy3 | combatacademy4 | combatacademy5 |
| composter1 | composter2 | composter3 | composter4 | composter5 |
| concretemixer1 | concretemixer2 | concretemixer3 | concretemixer4 | concretemixer5 |
| cook1 | cook2 | cook3 | cook4 | cook5 |
| cowboy1 | cowboy2 | cowboy3 | cowboy4 | cowboy5 |
| crusher1 | crusher2 | crusher3 | crusher4 | crusher5 |
| deliveryman1 | deliveryman2 | deliveryman3 | deliveryman4 | deliveryman5 |
| dyer1 | dyer2 | dyer3 | dyer4 | dyer5 |
| enchanter1 | enchanter2 | enchanter3 | enchanter4 | enchanter5 |
| farmer1 | farmer2 | farmer3 | farmer4 | farmer5 |
| fisherman1 | fisherman2 | fisherman3 | fisherman4 | fisherman5 |
| fletcher1 | fletcher2 | fletcher3 | fletcher4 | fletcher5 |
| florist1 | florist2 | florist3 | florist4 | florist5 |
| glassblower1 | glassblower2 | glassblower3 | glassblower4 | glassblower5 |
| graveyard1 | graveyard2 | graveyard3 | graveyard4 | graveyard5 |
| guardtower1 | guardtower2 | guardtower3 | guardtower4 | guardtower5 |
| hospital1 | hospital2 | hospital3 | hospital4 | hospital5 |
| library1 | library2 | library3 | library4 | library5 |
| lumberjack1 | lumberjack2 | lumberjack3 | lumberjack4 | lumberjack5 |
| mechanic1 | mechanic2 | mechanic3 | mechanic4 | mechanic5 |
| miner1 | miner2 | miner3 | miner4 | miner5 |
| mysticalsite1 | mysticalsite2 | mysticalsite3 | mysticalsite4 | mysticalsite5 |
| netherworker1 | netherworker2 | netherworker3 | netherworker4 | netherworker5 |
| plantation1 | plantation2 | plantation3 | plantation4 | plantation5 |
| rabbithutch1 | rabbithutch2 | rabbithutch3 | rabbithutch4 | rabbithutch5 |
| sawmill1 | sawmill2 | sawmill3 | sawmill4 | sawmill5 |
| school1 | school2 | school3 | school4 | school5 |
| shepherd1 | shepherd2 | shepherd3 | shepherd4 | shepherd5 |
| sifter1 | sifter2 | sifter3 | sifter4 | sifter5 |
| smeltery1 | smeltery2 | smeltery3 | smeltery4 | smeltery5 |
| stonemason1 | stonemason2 | stonemason3 | stonemason4 | stonemason5 |
| stonesmeltery1 | stonesmeltery2 | stonesmeltery3 | stonesmeltery4 | stonesmeltery5 |
| swineherder1 | swineherder2 | swineherder3 | swineherder4 | swineherder5 |
| tavern1 | tavern2 | tavern3 | N/A | N/A |
| townhall1 | townhall2 | townhall3 | townhall4 | townhall5 |
| university1 | university2 | university3 | university4 | university5 |
| warehouse1 | warehouse2 | warehouse3 | warehouse4 | warehouse5 |
Custom Supply Ships and Camps
The process for custom supply ships and camps is slightly different:
{% version "1.18.2" before=true %}
| Camp or Ship | File Name and Path |
|---|---|
| Camp | structurize/schematics/supplycamp/myownsupplycamp |
| Ship | structurize/schematics/supplyship/myownsupplyship |
So, for example, the path would be structurize/schematics/wildwest/builder1 for the Builder's Hut level 1 and structurize/schematics/supplycamp/wildwestsupplycamp for the supply camp.
{% endversion %}
{% version "1.19" after=true %}
| Camp or Ship | File Name and Path |
|---|---|
| Camp | blueprints/<myownstyle>/decorations/supplies/supplycamp |
| Ship | blueprints/<myownstyle>/decorations/supplies/supplyship |
| Nether Ship | blueprints/<myownstyle>/decorations/supplies/nethership |
So, for example, the path would be blueprints/wildwest/fundamentals/builder1 for the Builder's Hut level 1 and blueprints/wildwest/decorations/supplies/supplycamp for the supply camp.
{% endversion %}
You should always apply a groundlevel tag when making a supply camp/ship. The rules for guessing where the ground level is without the tag change depending whether they're placed by the build tool or the supply item, for legacy reasons.
Hut Requirements
| Building | Requirements | Suggested |
|---|---|---|
| {% building_link archery %} | 1 archery dummy (a hay bale with a button on it); 1 bed per level | at least 1 standing position per level (a glowstone block, or any block tagged with work) |
| {% building_link alchemist %} | 1 brewing stand per level; 2 soul sand per level starting at level 2 (with 4 soul sand); leaves next to logs, i.e. "trees" | |
| {% building_link bakery %} | 1 furnace | |
| {% building_link barracks %} | 1 Barracks Tower per level (up to level 4) | |
| {% building_link barrackstower %} | 1 bed per level | |
| {% building_link builder %} | 1 rack per level | |
| {% building_link combatacademy %} | 1 combat dummy per level (a pumpkin on top of a bale of hay); 1 bed per level | |
| {% building_link composter %} | 1 compost barrel per level | |
| {% building_link concretemixer %} | 3 blocks of flowing water with solid blocks below and air blocks above | |
| {% building_link dyer %} | 1 furnace | |
| {% building_link fisher %} | Hut block placed on a block at water level | At least 6x5x1 unobstructed body of water if integrating fishing location in the schematic |
| {% building_link flowershop %} | 4 compost blocks per level | |
| {% building_link glassblower %} | 1 furnace per level | |
| {% building_link graveyard %} | Named Graves, with the amount increasing per level | 14 named graves at level 1, 18 named graves at level 2, 27 named graves at level 3, 36 named graves at level 4, 50 named graves at level 5 |
| {% building_link guardtower %} | 1 bed for aesthetics | |
| {% building_link hospital %} | 1 bed per level | |
| {% building_link house %} | 1 bed per level | |
| {% building_link library %} | Bookshelves | |
| {% building_link mine %} | A few starting ladders where the shaft's ladders will go with the tags [cobble] and [ladder] | |
| {% building_link nethermine %} | A nether portal, and an enclosed 1x1x2 room | |
| {% building_link plantation %} | 12 per level, 4 for each of sugar cane, cactus and bamboo | |
| {% building_link restaurant %} | 1 furnace per level | |
| {% building_link school %} | 2 carpets per level | 4 carpets per level |
| {% building_link smeltery %} | 1 furnace per level | |
| {% building_link stonesmeltery %} | 1 furnace per level | |
| {% building_link tavern %} | 4 beds and a dining room | Horizontal barrels and/or vertical barrels |
| {% building_link university %} | Bookshelves | |
| {% building_link warehouse %} | Racks (more each level) |
Some buildings may also require tags to be set on certain blocks using the tag tool.
Level Requirements for Overworld Styles
| Level | Requirements |
|---|---|
| Level 1 | Very Easy - Wooden |
| Level 2 | Easy - Iron |
| Level 3 | Medium - Nether |
| Level 4 | Difficult - Ocean |
| Level 5 | Very Difficult - End |
Level Requirements for Nether Styles
| Level | Requirements |
|---|---|
| Level 1 | Very Easy - Nether |
| Level 2 | Easy - Rarer Nether |
| Level 3 | Medium - Overworld |
| Level 4 | Difficult - Ocean |
| Level 5 | Very Difficult - End |
{% version "1.19.2" after=true %}
Plantation Fields
In 1.19.2 and beyond, the plantation has been changed to include fields, just like the {% worker_link farmer %}. However, unlike the {% worker_link farmer %}, these fields can be completely free-form and created by the style designers. Each field has certain requirements for the {% worker_link planter %} to do their work successfully.
Each plant has 2 separate tags: a field tag and a work tag.
The field tags are given to the plantation field block to define what plants this field handles. The work tag is given based on the implementation of the field.
A field can have as many field tags as you want, but not 2 of the same.
| Plant | Field tag | Work tag | Maximum work tags |
|---|---|---|---|
| Sugar cane | sugar_field | sugar | 20 |
| Cactus | cactus_field | cactus | 20 |
| Bamboo | bamboo_field | bamboo | 20 |
| Cocoa | cocoa_field | cocoa | 5 (totalling 20 positions; details below) |
| Vine | vine_field | vine | 20 |
| Kelp | kelp_field | kelp | 20 |
| Seagrass | seagrass_field | seagrass | 121 (11 x 11 area) |
| Sea Pickles | seapickle_field | seapickle | 10 |
| Glow Berries | glowb_field | glowb_vine | 20 |
| Weeping Vines | weepv_field | weepv_vine | 20 |
| Twisting Vines | twistv_field | twistv_vine | 20 |
| Crimson Plants | crimsonp_field | crimsonp_ground | 121 (11 x 11 area) |
| Warped Plants | warpedp_field | warpedp_ground | 121 (11 x 11 area) |
The {% worker_link planter %} will always attempt to walk to any adjacent air block around the planting position. If none of the adjacent positions are air, the planter will attempt to walk to the block itself. This prevents the {% worker_link planter %} from standing on the block itself whilst, for example, placing a block down like cactus, after which the {% worker_link planter %} would be standing inside of the plant.
Note: Make sure that the {% worker_link planter %} can always get within about 4 blocks of the desired position. If not, they will teleport around to reach the position, which may not always work.
| X | ||
| X | P | X |
| X |
X = walking position
P = planting position
Note: Kelp is an exception to this behaviour. To prevent planters from diving into the water, the planter will walk to the first air block above the work tagged block and look up 26 blocks from the work tagged block. If this is not possible, they will not be able to harvest this plant, so ensure there is air above the water above the work tagged block.
- The red X is the position where the planter will walk to in the example image.
- The blue X is the position where the work tag of the block is.
For downwards-growing plants, the planter will attempt to stand above the work tagged block and harvest below them. Make sure the planter can reach the top of the stem.
Vertically Growing Plants (Upwards and Downwards)
A "vertically growing plant" is a plant that grows in a single line, either upwards or downwards; for example, Sugar Cane is a vertically growing plant that grows upwards. These plants always break fully when their root blocks are broken. The planter will break these at the second block from the root.
Each of these plants have a minimum and sometimes a maximum growth height.
The planter can only harvest them when they reach the minimum. If plants have a maximum height, the planter will have an increasingly higher chance to harvest the plant the taller it gets. Plants are only required to grow to the minimum height within the bounds of the schematic.
| Plant | Minimum height | Maximum height |
|---|---|---|
| Sugar cane | 3 | N/A |
| Cactus | 3 | N/A |
| Bamboo | 6 | 16 |
| Kelp | 2 | 25 |
| Glowberries | 3 | N/A |
| Weeping vines | 2 | 25 |
| Twisting vines | 2 | 25 |
Treeside Plants
Treeside plants grow directly on the sides of trees. For these plants, you only need to tag the tree's stem; the working positions will automatically be set to every horizontally adjacent block of the tagged stem. Currently this is only used for Cocoa beans.
Note that this means that the amount of tags you can actually place is the amount of working positions divided by 4!
Bonemealed Fields
Bonemealed fields will tell the planter to use bonemeal somewhere on the ground to grow plants as if the player had used bonemeal.
The amount of planting positions on these fields are usually unlimited because bonemealing the ground has a set area of effect. However, it is suggested not to make the fields too big; an area around 7x7 is lightly suggested.
Every bonemealed plant works slightly differently.
| Plant | Work tag location | |
|---|---|---|
| Seagrass | The block directly below the water should tagged; the planter will bonemeal the tagged block itself. Red Xs are where the planter will attempt to walk. Blue Xs are the blocks that are tagged with the work tag. | 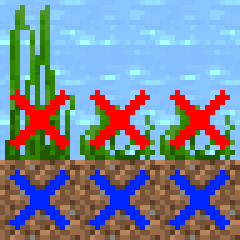 |
| Sea pickles | The block directly below the water should tagged. The planter will initially place the pickles, then bonemeal the pickles to let them grow. Red Xs are where the planter will attempt to walk. Blue Xs are the blocks that are tagged with the work tag. | 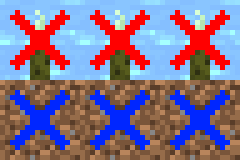 |
| Crimson plants | Tag all the nylium ground blocks where the plants are supposed to grow. | |
| Warped plants | Tag all the nylium ground blocks where the plants are supposed to grow. |
Percentage-based Harvesting
Percentage based harvesting fields will attempt to place a minimum percentage of plants down on given spots. These plants — such as vines — should then naturally spread to their surroundings without the player's help. The planter has no involvement in this process.
| Plant | Tag location |
|---|---|
| Vine | Tag all the positions where the vines themselves can spread to, NOT the blocks where the vines are attached to. |
{% endversion %}
Tips on Building
Do
- Make all levels of a hut have the same footprint for x, y, and z
- Place the hut block in the same location with the same rotation
- Make sure all racks and furnaces are in the same location through all levels (to prevent the contents spilling out when they're getting moved)
- Use placeholders where you want to keep any existing block (including from level to level), like the Barracks Towers in the Barracks schematic
- Use solid placeholders at or below ground level
- Place a
groundleveltag at ground level if your hut isn't sitting directly on the ground. - Use only vanilla blocks or Structurize blocks (for official styles)
- Use Books and Quills instead of blank books, or written books on a lectern. (Keep a copy of the original book and quill somewhere, if it turns out you made a mistake!)
Don't
- Use unobtainable items in builds (no command blocks, petrified wood, infested blocks, or mob heads (including player heads))
- Change someone else's style (officially) unless specifically asked to do so
- Rename schematics after scanning
Additional Information
How to override some built-in schematics?
{% version "1.18.2" before=true %}
Simply create a schematic file with the same style/name. For instance, to override the {% building_link builder %} wooden level 1, create a schematic file name called wooden/builder1.blueprint.
{% endversion %}
{% version "1.19" after=true %}
Unfortunately, this is not possible, unless you override the entire style (make a style pack with the same name as an existing style pack, in that case).
{% endversion %}
How to use custom huts?
{% version "1.18.2" before=true %}
The custom huts need to be copied in the schematics folder.
{% endversion %}
{% version "1.19" after=true %}
The custom huts need to be copied into a style pack.
{% endversion %}
Once copied, you can start your singleplayer or multiplayer game as usual. You should see them in the build tool (if you have the hut block in your inventory).
How to allow my players to use their own huts' schematics on my server?
You will have to copy them yourself in the blueprints folder on the server and restart it.
How to allow my players to use their scanned decoration schematics on my server?
Edit the Structurize configuration file at minecraft/config/structurize-common.toml and set allowPlayerSchematics to true. This allows the player to use their own decorations. It is not possible for the player to use their own huts' schematics. You can also limit the number of players' schematics at any given time by editing maxCachedSchematics (default is 100). When the limit is reached, the server will start deleting unused schematics.
How to disable built-in schematics completely?
Edit the Structurize configuration file at minecraft/config/structurize-common.toml and set ignoreSchematicsFromJar to true. Be aware: things will break if some huts' schematics are missing.
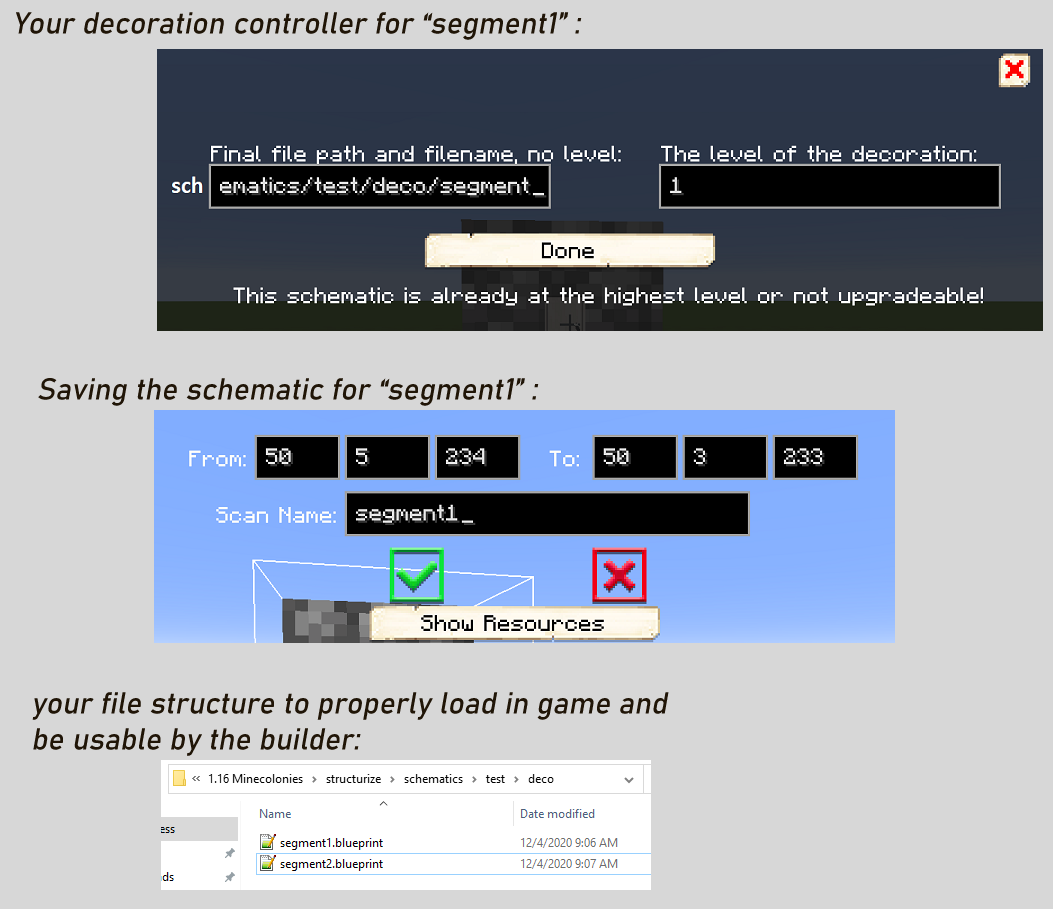
How to create upgradable decoration schematics?
{% version "1.18.2" before=true %}
Add the deco controller somewhere in the schematic with the name of the schematic, where you'll put it in the file directory, and its level. Make sure to actually put the decoration in that file path, but only after scanning - don't include the path in the scan name.
{% endversion %}
{% version "1.19" after=true %}
Put the deco controller somewhere in the schematic, and make sure the name of the schematic ends with a number while scanning. The decoration controller will automatically find the decoration in the same folder with the next number.
{% endversion %}
How to use custom mineshafts in style packs?
The size must be 9 x 4 x 9 blocks. They must be named and oriented exactly the same (i.e. do not rotate at all) as in the default style pack (careful: the names aren't entirely consistent with the layout, so make careful note which is which!) Use an existing style pack as a template along with the scan tool to create the blueprints.
{% version "1.18.2" before=true %}
The custom mineshafts need to be at schematics/yourstyle/miner/*.
{% endversion %}
{% version "1.19" after=true %}
The custom mineshafts need to be at `blueprints/yourstyle/infrastructure/mineshafts/*.
It's recommended that you use the tag tool and Tag Anchor to make the mineshafts invisible. Take care that the anchor is in the same position as in the original mineshafts -- the very center bottom block.
{% endversion %}
How to make custom quarries in style packs?
The {% building_link quarry %} is split into a "top part" and a "bottom part". Both parts only have one level each.
The top part is constructed by the Builder and is the part outside of the quarry pit -- decorative walls, fences, cranes, racks, etc. This contains the actual quarry hut block itself, which should pretty much always be on the second y level up from the bottom (i.e. the bottom layer is the ground level, then the hut is on the next layer up), although with some caveats this is not absolutely required.
The bottom part is constructed by the Quarrier and is the actual quarry pit itself, consisting mostly of placeholders, air blocks, and decorative elements. While you can also set the anchor manually, it's recommended to use a Tag Anchor. The anchor should normally be at the very top layer, although with some caveats it can be elsewhere.
{% version "1.18.2" before=true %}
The top parts must be named simplequarry1 and mediumquarry1, and the corresponding bottom parts are simplequarryshaft1 and mediumquarryshaft1.
{% endversion %}
{% version "1.19" after=true %}
The top part can be in any folder and name that you like (and you can have more than one alternate), but the canonical names are infrastructure/mineshafts/simplequarry1 and infrastructure/mineshafts/mediumquarry1. (For reasons, it's currently best to avoid using different names.)
The bottom part can only be infrastructure/mineshafts/simplequarryshaft1 and infrastructure/mineshafts/mediumquarryshaft1, regardless of what or where the top part was. As such, you can only make one of each per style pack.
{% endversion %}
Importantly: when built, the two schematics are aligned such that the anchor of the bottom part is exactly two blocks below the anchor of the top part. You should carefully align them when designing.
It is permitted for the quarry to be a slightly different size from the default versions, but it's strongly encouraged (for game balance reasons) to make each one approximately the same size as the originals, and in particular to have the same amount of air blocks in the bottom part, since this affects the final yield of cobble or other stone.
How to create parent/child buildings or decorations?
The Barracks and Barracks Tower always have a parent/child relationship (i.e. the towers are embedded within the barracks, not directly built separately with the build tool). It's also possible to do the same with other buildings -- either putting one or more buildings into a containing decoration (e.g. a "district" of related buildings) or even embedding buildings within other buildings.
Some popular combinations are to embed couriers within the warehouse, and fields within the farmer. Others combinations are possible, depending on your goals for the style -- but don't go too overboard! Some players like combination buildings since they fit nicely together, but others don't like them since they can take away flexibility and creativity when building a colony.
When designing parent/child schematics, the key is the light placeholder. The parent schematic needs to contain the child hut block in the correct position and rotation, along with light placeholders wherever there should be a block from the child, and the parent's own blocks. Similarly, the child schematic needs its own hut block and other blocks, and light placeholders wherever there should be a block from the parent. It can be helpful to make a temporary scan of either the parent or child and overlay them over the other to help line things up, or to build both together and then duplicate it and split apart the designs.
While strictly speaking it's only mandatory to include the child hut at the level that it's introduced into the parent and you could put only a placeholder at higher levels, it's strongly recommended to always include the child hut in every higher level of the parent. This works better when someone moves or repairs the parent, or skips levels and pastes it directly at a higher level.
Also remember that the child building can't be upgraded to a higher level than the parent building. This limit doesn't apply if the parent is a non-upgradeable decoration.
Be careful of "research loops" -- if the player needs to build a child before they can unlock a parent, that's a problem (unless you also have an alternate standalone of the child).
Since the parent will contain multiple hut blocks, you will always need to explicitly specify the anchor block (the main parent hut block if a building, or a deco controller or tag anchor if it's a decoration) when you scan, otherwise you'll get an error that the anchor was ambiguous and it will not work correctly.
{% version "1.18.2" before=true %}
Since you can only have one version of each building in each folder, combinations should be used very sparingly. The parent and child need to be in the same folder.
To place the child hut in the parent, you can simply shift-click it, just like when placing it in the child itself. Be sure to get the location and rotation correct -- the child hut will be built with the matching orientation relative to that.
{% endversion %}
{% version "1.19" after=true %}
The parent and child need to be in the same folder. This doesn't mean that you can't combine buildings that are normally in different folders -- just that the version that's intended to be the child must be in the same folder as the parent. You may still have another version of the child (to be used by itself, not as a child) in the original folder if you like.
It's not supported to have a child contain additional children of its own -- you're limited to just the two layers (though the parent can contain multiple children of either the same or different types).
Regardless of which method you use to build, be sure to get the location and rotation of the child hut correct when placing it in the parent -- the building will be built with the matching orientation relative to that.
If you've used the default folder and filenames for your child, then you can simply shift-click the child hut to place it into the parent, similar to older versions. However this is not the most recommended way to do things any more.
The preferred method is to make another level of your child containing only the hut block, giving it the same folder and name as your actual child, but level 0 (e.g. craftsmanship/storage/mycourier0). You can make it the same size as your real child (surrounded by placeholders) if you wish, but scanning a 1x1x1 is fine too. After scanning, you need to move this to its final location in your actual style pack, and then paste it from there (not from your scans!) into your parent. It doesn't matter whether you use schematic or constructed paste. Paste the same level 0 into all levels of the parent. After it's pasted, you can delete the level 0 blueprint -- it should not be included in your final released style pack. (Note that when you go to paste it, the build tool labels it as "level 1" of 6. You can confirm you have the right one by checking the tooltip name.)
Another option is called "auto-levelling". This is where instead of making and pasting a level 0 into each level of the parent, you instead paste the actual matching child level (i.e. level 1 child in the level 1 parent, level 2 child in the level 2 parent, etc). Again it doesn't matter whether you use schematic or constructed paste, but either way you'll probably have to fix up some of the overlapping blocks afterward. You do still need to include the child hut's blueprints in your released style pack, and you do still have to paste it from your actual style pack and not your scans folder.
With auto-levelling, the builder will upgrade the child at the same time as upgrading the parent, instead of the player needing to explicitly build or upgrade one after the other. While this may sound simpler, there are some downsides: the biggest is that won't work well for child buildings that have required functional blocks (such as beds, furnaces, racks, etc), although purely decorative ones are fine. You also should not use this where the child is locked behind research, unless you can be absolutely certain that it's already unlocked (e.g. if the parent is unlocked after the child -- though still be careful of loops). The "level 0" method doesn't have these issues.
Since you can have multiple alternates of buildings (in the same or separate folders), it's possible to make a particular building type have both a standalone version as well as a version embedded as a child. It's strongly recommended to use the tag tool to mark any blueprint intended for use only as a child (in the child schematic itself) as invisible so that it doesn't show up for building standalone -- especially as child versions are often simpler or cheaper and may be missing walls or other things intended to be provided by the parent, so won't look good on their own or might break game balance. It's also possible to have each child of a parent be its own unique blueprint -- but that requires even more scans and more care when pasting to use the right alternate.
{% endversion %}
What if I have another question?
There's a channel in the Discord server specifically for asking questions about designing your own schematics.
